
Wade Proxy – ResiProx Proxy Integration Guide
Contents9 sections
Introduction
Welcome to the Wade Anti-detect Browser proxy integration guide. This guide will walk you through the steps required to configure and integrate proxies with Wade. Whether you are using proxies for enhanced privacy, to bypass geographical restrictions, or for multiple account management, this guide will help you get set up quickly.
Prerequisites
Before you begin, ensure you have the following:
- An active Wade Anti-detect Browser account
- An active ResiProx account (HTTP or SOCKS proxies)
Step 1: Choose Your Residential Proxy
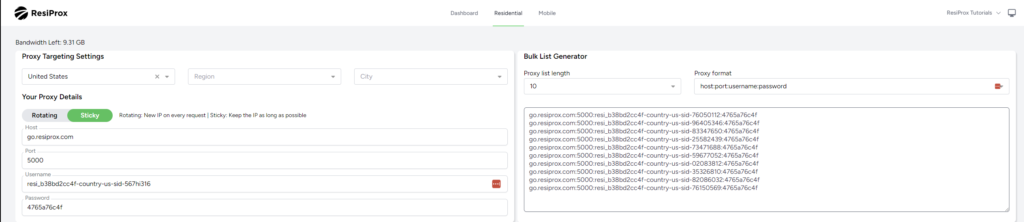
- In this example we will use a Rotating Residential Proxy with Sticky session from ResiProx
- Choose your Proxy Targeting Settings – You can target proxies by Country, Region & City
Step 2: Open Wade & Create a New Profile
- Log in to your Wade account.
- Create a New Cluster.
- Create a New Browser Account
- Find the Proxy settings section.
Step 3: Choose Proxy Type
- Select the proxy protocol you want to use, HTTP or SOCKS, ResiProx supports both connection protocols.
- Enter the proxy server details:
- Proxy Server Address: go.resiprox.com
- Port: 5000
- Username and Password: Enter your proxy details from Step 1
Step 4: Enter Your Proxy Settings
- Pick HTTP or SOCKS5
- Enter the host (go.resiprox.com) and port (5000) as well as your username and password from the ResiProx Dashboard.

Step 5: Troubleshooting
If you encounter issues with the proxy integration, consider the following:
- Check Proxy Details: Ensure the proxy server address, port, and authentication details are correct.
- Firewall/Antivirus/VPN Settings: Ensure your firewall, VPN or antivirus software isn’t blocking the connection.
- Proxy Service Status: Verify that your proxy service is active and functioning correctly.
Step 6: Additional Settings (Optional)
- Sticky Sessions or New IP on every request: Decide if you want to keep the same IP for as long as possible(Sticky Session) or if you want a new IP on every request.
- Geolocation Settings: Configure the proxy to use specific geolocations if your software or use case requires it.
Conclusion
You have now successfully integrated proxies with Wade Anti-Detect Browser. This setup allows you to enjoy enhanced privacy, bypass geo-blocks, and optimise your tasks success rate. For additional help, refer to the Wade’s customer support documentation or contact our Website’s Livechat.